Table of Contents
Introduction
Creating Your First Web Page in HTML: Every website you see online whether it’s a blog, portfolio, or eCommerce store starts with HTML (HyperText Markup Language). HTML is the backbone of the web. It defines the structure of a webpage and tells browsers how to display content like text, images, and links.
If you’re new to web development, learning how to create your first web page in HTML is the perfect starting point. In this guide, we’ll walk you through everything step by step from writing your first line of code to understanding the structure of an HTML document.

What is HTML?
HTML (HyperText Markup Language) is a markup language used to structure content on the web. It uses tags and elements to define parts of a webpage such as headings, paragraphs, images, links, and more.
For example:
<p>Hello, World!</p>
Here,
<p>is the opening tag (defines the start of a paragraph)Hello, World!is the content</p>is the closing tag (defines the end of the paragraph)
Together, these form an HTML element.
Step 1: Setting Up Your Workspace
To create a web page, you don’t need any expensive tools — just a simple text editor and a web browser.
You’ll need:
- A text editor such as Notepad (Windows), TextEdit (Mac), or code editors like VS Code or Sublime Text.
- A web browser like Chrome, Firefox, or Edge to view your page.
Steps:
- Open your text editor.
- Create a new file.
- Save it as
index.html.
The .html extension tells the browser that this file contains HTML code.
Step 2: Writing the Basic HTML Structure
Every HTML page follows a standard structure. Here’s the most basic layout:
<!DOCTYPE html>
<html lang="en">
<head>
    <meta charset="UTF-8">
    <meta name="viewport" content="width=device-width, initial-scale=1.0">
    <title>My First Web Page</title>
</head>
<body>
    <h1>Welcome to My Website</h1>
    <p>This is my first web page created with HTML!</p>
</body>
</html>

Let’s break it down:
<!DOCTYPE html>— tells the browser that this is an HTML5 document.<html>— the root element that wraps all content.<head>— contains metadata (information about the page like title, description, and links to CSS/JS files).<title>— defines the title of the webpage shown in the browser tab.<body>— contains the main content displayed on the page.
Step 3: Adding Headings and Paragraphs
HTML provides six heading tags — from <h1> (largest) to <h6> (smallest).
Example:
<h1>This is a Main Heading</h1>
<h2>This is a Subheading</h2>
<p>This is a paragraph that explains more about the topic.</p>

Use headings to organize your content. The <h1> tag is typically used once per page — usually for the main title.
Step 4: Adding Links and Images
Links and images are essential to make your page interactive and visually appealing.
Adding a Link:
<a href="https://www.example.com">Visit Example Website</a>
<a>defines a hyperlink.- The
hrefattribute specifies the URL.
Adding an Image:
<img src="images/picture.jpg" alt="A sample image">
<img>embeds an image.srcspecifies the image path.altprovides alternative text for accessibility.

Step 5: Creating Lists
HTML supports two types of lists ordered and unordered.
Unordered List:
<ul>
    <li>HTML</li>
    <li>CSS</li>
    <li>JavaScript</li>
</ul>
Ordered List:
<ol>
    <li>Learn HTML</li>
    <li>Learn CSS</li>
    <li>Build a Website</li>
</ol>
<ul> creates bullet points, while <ol> creates numbered lists.
Step 6: Adding Comments
Comments help explain your code and are ignored by browsers.
<!-- This is a comment -->
<p>This paragraph will be visible on the webpage.</p>
Comments are useful when working on large projects or collaborating with others.
Step 7: Adding Tables
HTML tables display structured data like pricing, schedules, or comparisons.
Example:
<table border="1">
    <tr>
        <th>Language</th>
        <th>Use</th>
    </tr>
    <tr>
        <td>HTML</td>
        <td>Structure</td>
    </tr>
    <tr>
        <td>CSS</td>
        <td>Styling</td>
    </tr>
</table>
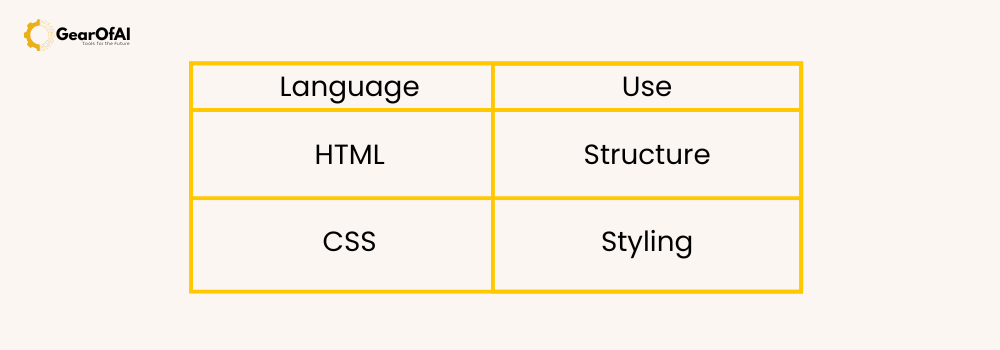
Here:
<table>defines a table.<tr>defines a table row.<th>defines a table header cell.<td>defines a table data cell.
Step 8: Adding Forms
Forms allow users to input data, such as signing up or logging in.
Example:
<form action="/submit-form" method="post">
    <label for="name">Name:</label>
    <input type="text" id="name" name="name" required>
    <br><br>
    <label for="email">Email:</label>
    <input type="email" id="email" name="email" required>
    <br><br>
    <input type="submit" value="Submit">
</form>
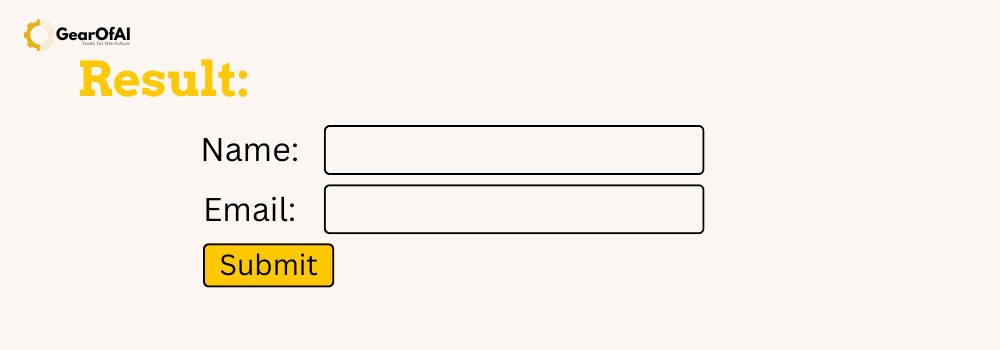
Explanation:
<form>creates a form container.<input>adds form fields.actiondefines where data will be sent.method="post"sends data securely.
Step 9: Organizing with Divs and Spans
You can group sections of your page using <div> and <span>.
Example:
<div class="container">
    <h2>About Me</h2>
    <p>I am learning how to build websites using HTML.</p>
</div>
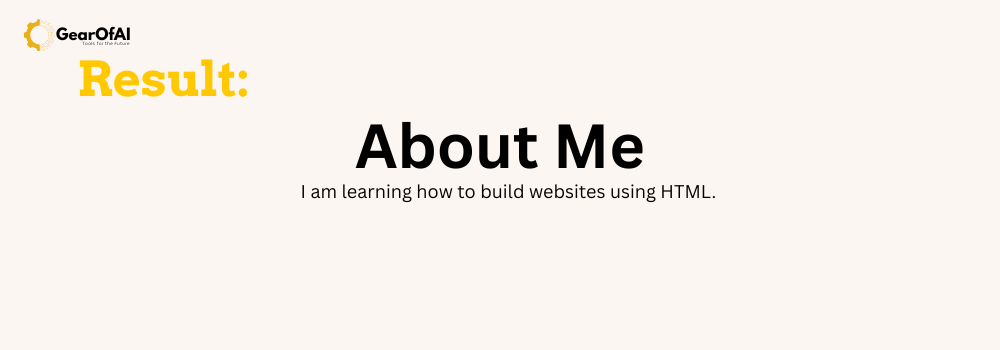
<div>is a block-level container (used for layout).<span>is an inline container (used for styling small text portions).
These elements become even more powerful when combined with CSS.
Step 10: Saving and Viewing Your Page
Once your HTML code is ready:
- Save your file as
index.html. - Double-click it or open it in your browser.
You’ll now see your first webpage in action! 🎉
Bonus Tip: Improve with CSS
HTML builds the structure — but to make your page look beautiful, you’ll need CSS (Cascading Style Sheets).
Example:
<style>
    body {
        background-color: #f4f4f4;
        font-family: Arial, sans-serif;
        text-align: center;
    }
    h1 {
        color: #0073e6;
    }
    p {
        font-size: 18px;
    }
</style>
Adding this CSS inside the <head> section will give your webpage a polished, modern look.
Conclusion
Congratulations! You’ve just created your first web page using HTML. You’ve learned how to structure content, add text, images, links, tables, and forms the building blocks of every website.
HTML may seem simple at first, but it forms the foundation of all web development. As you continue learning, try exploring CSS for styling and JavaScript for interactivity.
Keep experimenting, practice regularly, and soon you’ll be building complete websites from scratch!