Table of Contents
Understanding Forms and Input Elements in HTML
Understanding Forms and Input Elements in HTML: When you visit any modern website whether you’re signing up, logging in, submitting feedback, or making a purchase you’re likely interacting with an HTML form. Forms are the backbone of user interaction on the web. They allow users to send data to a server and enable websites to collect, process, and respond to that information effectively.
In this blog, we’ll explore HTML forms and input elements, understand how they work, and see practical examples to help you build your own.
What is an HTML Form?
An HTML form is a section of a webpage that collects input from users. That data is then sent to a server for processing.
You can think of forms as a communication bridge between the website and the user.
A basic HTML form looks like this:
<form action="/submit" method="post">
  <label for="name">Name:</label>
  <input type="text" id="name" name="username"><br><br>

  <label for="email">Email:</label>
  <input type="email" id="email" name="useremail"><br><br>

  <input type="submit" value="Submit">
</form>

The <form> Tag The Container
The <form> tag defines the form area in HTML.
It usually includes various input fields, buttons, and labels.
Important Attributes of <form>:
| Attribute | Description |
|---|---|
action | Defines where to send the data when the form is submitted (a URL or script). |
method | Specifies the HTTP method used: GET or POST. |
name | Gives the form a name (useful in scripting). |
target | Determines where to display the response (e.g., _blank, _self). |
enctype | Defines how the data should be encoded (used when uploading files). |
Example:
<form action="submit_form.php" method="post" target="_blank">
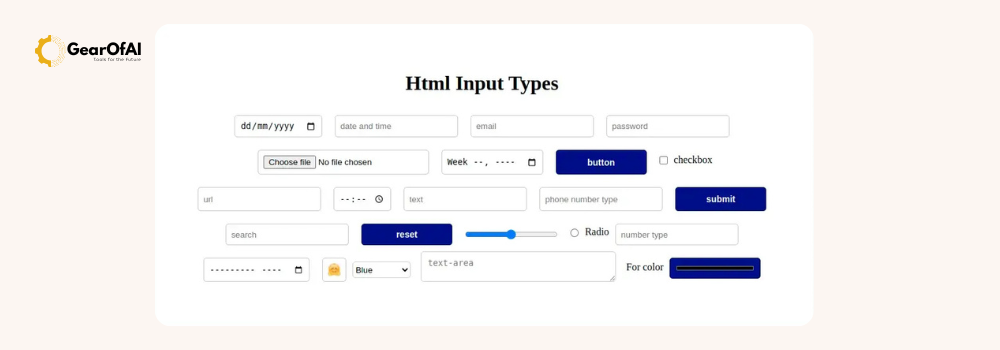
Understanding Input Elements
The <input> tag is the most commonly used element in forms.
It can represent text fields, checkboxes, radio buttons, file uploads, and more — depending on its type attribute.
Common Input Types and Their Uses:
| Type | Example | Description |
|---|---|---|
text | <input type="text"> | For single-line text input. |
email | <input type="email"> | For collecting email addresses. |
password | <input type="password"> | Hides input for passwords. |
number | <input type="number"> | Allows only numeric values. |
date | <input type="date"> | Adds a date picker. |
checkbox | <input type="checkbox"> | For multiple selections. |
radio | <input type="radio"> | For selecting one option. |
file | <input type="file"> | For uploading files. |
submit | <input type="submit"> | Submits the form data. |
Example:
<form>
  <label>Name:</label>
  <input type="text" name="name"><br>

  <label>Email:</label>
  <input type="email" name="email"><br>

  <label>Password:</label>
  <input type="password" name="password"><br>

  <input type="submit" value="Register">
</form>
Using Labels Correctly
The <label> tag improves form accessibility.
It allows users to click the label text to focus the corresponding input field.
Example:
<label for="email">Email:</label>
<input type="email" id="email" name="email">
Best Practice: Always use the for attribute in <label> that matches the id of the input.
Working with Radio Buttons and Checkboxes
These two input types are often used to collect predefined options.
Radio Buttons (Choose One Option)
<p>Choose your gender:</p>
<input type="radio" id="male" name="gender" value="male">
<label for="male">Male</label>

<input type="radio" id="female" name="gender" value="female">
<label for="female">Female</label>
Note: All radio buttons in a group should share the same
nameattribute.
Checkboxes (Choose Multiple Options)
<p>Select your interests:</p>
<input type="checkbox" id="coding" name="interest" value="coding">
<label for="coding">Coding</label>

<input type="checkbox" id="design" name="interest" value="design">
<label for="design">Design</label>
The <textarea> Element
The <textarea> tag is used when users need to type multiple lines of text, such as comments or messages.
Example:
<label for="message">Your Message:</label><br>
<textarea id="message" name="message" rows="5" cols="40"></textarea>
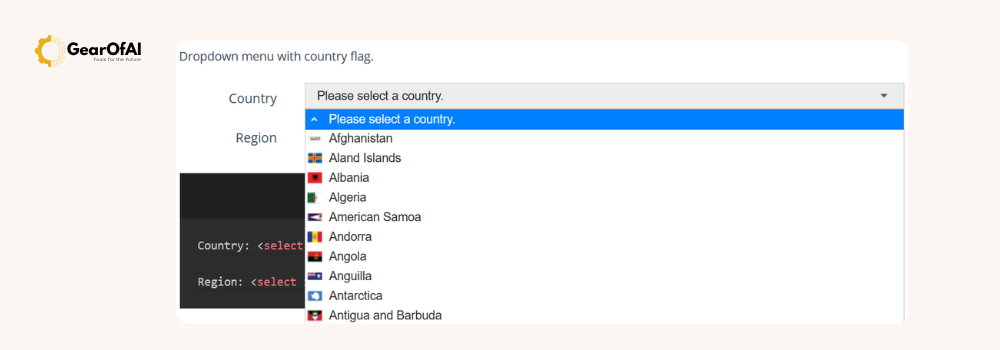
Dropdown Menus The <select> Element
The <select> tag creates a dropdown list.
Each option inside it is defined with the <option> tag.
Example:
<label for="country">Choose a country:</label>
<select id="country" name="country">
  <option value="pakistan">Pakistan</option>
  <option value="usa">USA</option>
  <option value="uk">UK</option>
</select>
Buttons in HTML Forms
HTML provides multiple ways to add buttons — including the <button> tag and input buttons.
Example:
<button type="submit">Submit Form</button>
<button type="reset">Reset</button>
| Type | Function |
|---|---|
submit | Sends form data to the server. |
reset | Clears all input fields. |
button | A general-purpose button (can trigger JavaScript). |
Form Validation
HTML5 introduced built-in validation features to ensure correct input before submission.
Example:
<form>
  <input type="email" required>
  <input type="submit">
</form>
Common Validation Attributes:
| Attribute | Description |
|---|---|
required | Makes the field mandatory. |
min / max | Sets number or date limits. |
maxlength | Limits text input length. |
pattern | Allows regex-based validation. |
placeholder | Displays hint text in input box. |
Example with multiple attributes:
<input type="text" name="username" placeholder="Enter your name" required maxlength="20">
Form Method: GET vs POST
When a form is submitted, data is sent using an HTTP method — either GET or POST.
| Method | Description | Use Case |
|---|---|---|
GET | Data is appended to the URL (visible). | For search or filters. |
POST | Data is hidden in the request body. | For secure submissions (login, signup). |
Example:
<form action="/signup" method="post">
Grouping Fields The <fieldset> and <legend> Tags
These tags are used to organize related form elements visually.
Example:
<fieldset>
  <legend>Personal Info</legend>
  <label>Name:</label>
  <input type="text" name="name">
</fieldset>
Enhancing Forms with CSS and JavaScript
While HTML defines structure, CSS improves design, and JavaScript adds interactivity.
You can style inputs like this:
input, textarea {
  border: 1px solid #ccc;
  padding: 10px;
  border-radius: 5px;
}
input:focus {
  border-color: #007bff;
}
Conclusion
HTML forms are essential for creating interactive, dynamic websites.
By understanding input types, attributes, and structure, you can build forms for any purpose — from simple contact pages to complex sign-up systems.
Mastering forms is the foundation of web development, as it connects users and websites in meaningful ways.
External Links (for SEO & Reference)
Contact:
For more tutorials and guides, visit GearOfAI.com or email us at info@gearofai.com.